Mudanças entre as edições de "Coleções"
Ir para navegação
Ir para pesquisar
| Linha 39: | Linha 39: | ||
!style="background:#FFEBCD;" | Bonus | !style="background:#FFEBCD;" | Bonus | ||
|- | |- | ||
!style="background:#EAFFE6;"| | !style="background:#EAFFE6;"| Arredores de Geffen (2) | ||
!style="background:#EAFFE6;"| | !style="background:#EAFFE6;"| +1 | ||
|- | |- | ||
!style="background:#FBFFE6;"| | !style="background:#FBFFE6;"| Arredores de Geffen (10) | ||
!style="background:#FBFFE6;"| | !style="background:#FBFFE6;"| +1 | ||
|- | |- | ||
!style="background:#FFFBE6;"| | !style="background:#FFFBE6;"| | ||
| Linha 61: | Linha 61: | ||
!style="background:#FFEBCD;" | Bonus | !style="background:#FFEBCD;" | Bonus | ||
|- | |- | ||
!style="background:#EAFFE6;"| | !style="background:#EAFFE6;"| Esgoto de Zero (A1) | ||
!style="background:#EAFFE6;"| | !style="background:#EAFFE6;"| +1 | ||
|- | |- | ||
!style="background:#FBFFE6;"| | !style="background:#FBFFE6;"| Esgoto de Zero (A2) | ||
!style="background:#FBFFE6;"| | !style="background:#FBFFE6;"| +1 | ||
|- | |- | ||
!style="background:#FFFBE6;"| | !style="background:#FFFBE6;"| Monte Mjolnir (10) | ||
!style="background:#FFFBE6;"| | !style="background:#FFFBE6;"| +1 | ||
|- | |- | ||
!style="background:#FFF2E6;"| | !style="background:#FFF2E6;"| | ||
| Linha 83: | Linha 83: | ||
!style="background:#FFEBCD;" | Bonus | !style="background:#FFEBCD;" | Bonus | ||
|- | |- | ||
!style="background:#EAFFE6;"| | !style="background:#EAFFE6;"| Vila dos Orcs do Oeste | ||
!style="background:#EAFFE6;"| | !style="background:#EAFFE6;"| +1 | ||
|- | |- | ||
!style="background:#FBFFE6;"| | !style="background:#FBFFE6;"| | ||
| Linha 105: | Linha 105: | ||
!style="background:#FFEBCD;" | Bonus | !style="background:#FFEBCD;" | Bonus | ||
|- | |- | ||
!style="background:#EAFFE6;"| | !style="background:#EAFFE6;"| Arredores de Geffen (0) | ||
!style="background:#EAFFE6;"| | !style="background:#EAFFE6;"| +1 | ||
|- | |||
!style="background:#FBFFE6;"| Arredores de Geffen (1) | |||
!style="background:#FBFFE6;"| +1 | |||
|- | |||
!style="background:#FFFBE6;"| Arredores de Geffen (3) | |||
!style="background:#FFFBE6;"| +1 | |||
|- | |- | ||
!style="background:# | !style="background:#FFF2E6;"| Arredores de Geffen (4) | ||
!style="background:# | !style="background:#FFF2E6;"| +1 | ||
|- | |- | ||
!style="background:# | !style="background:#FFE6E6;"| Arredores de Geffen (7) | ||
!style="background:# | !style="background:#FFE6E6;"| +1 | ||
|- | |- | ||
!style="background:# | !style="background:#FFE6E6;"| Arredores de Geffen (9) | ||
!style="background:# | !style="background:#FFE6E6;"| +1 | ||
|- | |- | ||
!style="background:#FFE6E6;"| | !style="background:#FFE6E6;"| Feudo Britoniah | ||
!style="background:#FFE6E6;"| | !style="background:#FFE6E6;"| +1 | ||
|- | |- | ||
|} | |} | ||
| Linha 127: | Linha 133: | ||
!style="background:#FFEBCD;" | Bonus | !style="background:#FFEBCD;" | Bonus | ||
|- | |- | ||
!style="background:#EAFFE6;"| | !style="background:#EAFFE6;"| Monte Mjolnir (9) | ||
!style="background:#EAFFE6;"| | !style="background:#EAFFE6;"| +1 | ||
|- | |- | ||
!style="background:#FBFFE6;"| | !style="background:#FBFFE6;"| | ||
| Linha 196: | Linha 202: | ||
!style="background:#FFEBCD;" | Bonus | !style="background:#FFEBCD;" | Bonus | ||
|- | |- | ||
!style="background:#EAFFE6;"| | !style="background:#EAFFE6;"| Monte Mjolnir (12) | ||
!style="background:#EAFFE6;"| | !style="background:#EAFFE6;"| +2 | ||
|- | |- | ||
!style="background:#FBFFE6;"| | !style="background:#FBFFE6;"| | ||
| Linha 387: | Linha 393: | ||
!style="background:#FFEBCD;" | Bonus | !style="background:#FFEBCD;" | Bonus | ||
|- | |- | ||
!style="background:#EAFFE6;"| | !style="background:#EAFFE6;"| Campo de treinamento da academia | ||
!style="background:#EAFFE6;"| | !style="background:#EAFFE6;"| +75 | ||
|- | |- | ||
!style="background:#FBFFE6;"| | !style="background:#FBFFE6;"| Esgoto de Zero (A4) | ||
!style="background:#FBFFE6;"| | !style="background:#FBFFE6;"| +70 | ||
|- | |- | ||
!style="background:#FFFBE6;"| | !style="background:#FFFBE6;"| Monte Mjolnir (11) | ||
!style="background:#FFFBE6;"| | !style="background:#FFFBE6;"| +100 | ||
|- | |- | ||
!style="background:#FFF2E6;"| | !style="background:#FFF2E6;"| | ||
| Linha 663: | Linha 669: | ||
!style="background:#FFEBCD;" | Bonus | !style="background:#FFEBCD;" | Bonus | ||
|- | |- | ||
!style="background:#EAFFE6;"| | !style="background:#EAFFE6;"| Zero | ||
!style="background:#EAFFE6;"| | !style="background:#EAFFE6;"| +1% | ||
|- | |||
!style="background:#FBFFE6;"| Morroc | |||
!style="background:#FBFFE6;"| +1% | |||
|- | |||
!style="background:#FFFBE6;"| Geffen | |||
!style="background:#FFFBE6;"| +1% | |||
|- | |||
!style="background:#FFF2E6;"| Payon | |||
!style="background:#FFF2E6;"| +1% | |||
|- | |||
!style="background:#FFE6E6;"| Alberta | |||
!style="background:#FFE6E6;"| 1% | |||
|- | |||
!style="background:#FFE6E6;"| Izlude | |||
!style="background:#FFE6E6;"| 1% | |||
|- | |||
!style="background:#FFE6E6;"| Aldebaran | |||
!style="background:#FFE6E6;"| 1% | |||
|- | |||
!style="background:#FFE6E6;"| Comodo | |||
!style="background:#FFE6E6;"| 1% | |||
|- | |- | ||
!style="background:# | !style="background:#FFE6E6;"| Jawaii | ||
!style="background:# | !style="background:#FFE6E6;"| 1% | ||
|- | |- | ||
!style="background:# | !style="background:#FFE6E6;"| Nifheim | ||
!style="background:# | !style="background:#FFE6E6;"| 1% | ||
|- | |- | ||
!style="background:# | !style="background:#FFE6E6;"| Umbala | ||
!style="background:# | !style="background:#FFE6E6;"| 1% | ||
|- | |- | ||
!style="background:#FFE6E6;"| | !style="background:#FFE6E6;"| Yuno | ||
!style="background:#FFE6E6;"| | !style="background:#FFE6E6;"| 1% | ||
|- | |- | ||
|} | |} | ||
| Linha 689: | Linha 716: | ||
!style="background:#FFEBCD;" | Bonus | !style="background:#FFEBCD;" | Bonus | ||
|- | |- | ||
!style="background:#EAFFE6;"| | !style="background:#EAFFE6;"| Esgoto de Zero (A3) | ||
!style="background:#EAFFE6;"| | !style="background:#EAFFE6;"| +1% | ||
|- | |- | ||
!style="background:#FBFFE6;"| | !style="background:#FBFFE6;"| | ||
| Linha 718: | Linha 745: | ||
!style="background:#EAFFE6;"| | !style="background:#EAFFE6;"| | ||
|- | |- | ||
!style="background:#FBFFE6;"| | !style="background:#FBFFE6;"| | ||
!style="background:#FBFFE6;"| | !style="background:#FBFFE6;"| | ||
|- | |- | ||
!style="background:#FFFBE6;"| | !style="background:#FFFBE6;"| | ||
!style="background:#FFFBE6;"| | !style="background:#FFFBE6;"| | ||
|- | |- | ||
| Linha 737: | Linha 764: | ||
!style="background:#FFEBCD;" | Bonus | !style="background:#FFEBCD;" | Bonus | ||
|- | |- | ||
!style="background:#EAFFE6;"| | !style="background:#EAFFE6;"| Mina abandonada de Mjolnir e Zero (A1) | ||
!style="background:#EAFFE6;"| | !style="background:#EAFFE6;"| -1% | ||
|- | |- | ||
!style="background:#FBFFE6;"| | !style="background:#FBFFE6;"| | ||
| Linha 759: | Linha 786: | ||
!style="background:#FFEBCD;" | Bonus | !style="background:#FFEBCD;" | Bonus | ||
|- | |- | ||
!style="background:#EAFFE6;"| | !style="background:#EAFFE6;"| Mina abandonada de Mjolnir e Zero (A2) | ||
!style="background:#EAFFE6;"| | !style="background:#EAFFE6;"| -1% | ||
|- | |- | ||
!style="background:#FBFFE6;"| | !style="background:#FBFFE6;"| Mina abandonada de Mjolnir e Zero (A3) | ||
!style="background:#FBFFE6;"| | !style="background:#FBFFE6;"| -2% | ||
|- | |- | ||
!style="background:#FFFBE6;"| | !style="background:#FFFBE6;"| | ||
| Linha 845: | Linha 872: | ||
BONUS EXTRAS = AUMENTO DE DANO (CRITICO/CURTA/LONGA DISTANCIA) | BONUS EXTRAS = AUMENTO DE DANO (CRITICO/CURTA/LONGA DISTANCIA) | ||
------------------------------------------------------------------------------------------------------------------------------------------------------------------------------------------------------ | ------------------------------------------------------------------------------------------------------------------------------------------------------------------------------------------------------ | ||
== % DE DANO FISICO A CURTA DISTANCIA == | |||
{| class="wikitable" | |||
!style="background:#FFEBCD;" | Mapa | |||
!style="background:#FFEBCD;" | Bonus | |||
|- | |||
!style="background:#EAFFE6;"| Arredores de Geffen (8) | |||
!style="background:#EAFFE6;"| +2% | |||
|- | |||
!style="background:#FBFFE6;"| Arredores de Geffen (11) | |||
!style="background:#FBFFE6;"| +5% | |||
|- | |||
!style="background:#FFFBE6;"| Floresta Kordt | |||
!style="background:#FFFBE6;"| +2% | |||
|- | |||
|} | |||
== % DE DANO FISICO A DISTANCIA == | == % DE DANO FISICO A DISTANCIA == | ||
| Linha 867: | Linha 909: | ||
|- | |- | ||
|} | |} | ||
== CRITICO COM ATAQUES A DISTANCIA == | == CRITICO COM ATAQUES A DISTANCIA == | ||
{| class="wikitable" | {| class="wikitable" | ||
| Linha 898: | Linha 941: | ||
!style="background:#FFEBCD;" | Bonus | !style="background:#FFEBCD;" | Bonus | ||
|- | |- | ||
!style="background:#EAFFE6;"| | !style="background:#EAFFE6;"| Monte Mjolnir (6) | ||
!style="background:#EAFFE6;"| | !style="background:#EAFFE6;"| -3% | ||
|- | |- | ||
!style="background:#FBFFE6;"| | !style="background:#FBFFE6;"| | ||
| Linha 946: | Linha 989: | ||
!style="background:#FFEBCD;" | Bonus | !style="background:#FFEBCD;" | Bonus | ||
|- | |- | ||
!style="background:#EAFFE6;"| | !style="background:#EAFFE6;"| Calabouço de Geffen (A4) | ||
!style="background:#EAFFE6;"| | !style="background:#EAFFE6;"| +2% | ||
|- | |- | ||
!style="background:#FBFFE6;"| | !style="background:#FBFFE6;"| | ||
| Linha 968: | Linha 1 011: | ||
!style="background:#FFEBCD;" | Bonus | !style="background:#FFEBCD;" | Bonus | ||
|- | |- | ||
!style="background:#EAFFE6;"| | !style="background:#EAFFE6;"| Monte Mjolnir (4) | ||
!style="background:#EAFFE6;"| | !style="background:#EAFFE6;"| +2% | ||
|- | |- | ||
!style="background:#FBFFE6;"| | !style="background:#FBFFE6;"| | ||
| Linha 1 107: | Linha 1 150: | ||
!style="background:#FFEBCD;" | Bonus | !style="background:#FFEBCD;" | Bonus | ||
|- | |- | ||
!style="background:#EAFFE6;"| | !style="background:#EAFFE6;"| Calabouço de Geffen (A1) | ||
!style="background:#EAFFE6;"| | !style="background:#EAFFE6;"| +1% | ||
|- | |- | ||
!style="background:#FBFFE6;"| | !style="background:#FBFFE6;"| Calabouço de Geffen (A1) | ||
!style="background:#FBFFE6;"| | !style="background:#FBFFE6;"| +2% | ||
|- | |- | ||
!style="background:#FFFBE6;"| | !style="background:#FFFBE6;"| Calabouço de Geffen (A1) | ||
!style="background:#FFFBE6;"| | !style="background:#FFFBE6;"| +5% | ||
|- | |- | ||
!style="background:# | !style="background:#FFFBE6;"| Calabouço dos Orcs (A1) | ||
!style="background:# | !style="background:#FFFBE6;"| +2% | ||
|- | |- | ||
!style="background:# | !style="background:#FFFBE6;"| Calabouço dos Orcs (A2) | ||
!style="background:# | !style="background:#FFFBE6;"| +3% | ||
|- | |- | ||
|} | |} | ||
| Linha 1 129: | Linha 1 172: | ||
!style="background:#FFEBCD;" | Bonus | !style="background:#FFEBCD;" | Bonus | ||
|- | |- | ||
!style="background:#EAFFE6;"| | !style="background:#EAFFE6;"| Monte Mjolnir (7) | ||
!style="background:#EAFFE6;"| | !style="background:#EAFFE6;"| +3% | ||
|- | |- | ||
!style="background:#FBFFE6;"| | !style="background:#FBFFE6;"| | ||
| Linha 1 173: | Linha 1 216: | ||
!style="background:#FFEBCD;" | Bonus | !style="background:#FFEBCD;" | Bonus | ||
|- | |- | ||
!style="background:#EAFFE6;"| | !style="background:#EAFFE6;"| Monte Mjolnir (1) | ||
!style="background:#EAFFE6;"| | !style="background:#EAFFE6;"| +1% | ||
|- | |- | ||
!style="background:#FBFFE6;"| | !style="background:#FBFFE6;"| Monte Mjolnir (2) | ||
!style="background:#FBFFE6;"| | !style="background:#FBFFE6;"| +1% | ||
|- | |- | ||
!style="background:#FFFBE6;"| | !style="background:#FFFBE6;"| Monte Mjolnir (8) | ||
!style="background:#FFFBE6;"| | !style="background:#FFFBE6;"| +1% | ||
|- | |- | ||
!style="background:#FFF2E6;"| | !style="background:#FFF2E6;"| | ||
| Linha 1 195: | Linha 1 238: | ||
!style="background:#FFEBCD;" | Bonus | !style="background:#FFEBCD;" | Bonus | ||
|- | |- | ||
!style="background:#EAFFE6;"| | !style="background:#EAFFE6;"| Monte Mjolnir (3) | ||
!style="background:#EAFFE6;"| | !style="background:#EAFFE6;"| +2% | ||
|- | |- | ||
!style="background:#FBFFE6;"| | !style="background:#FBFFE6;"| Monte Mjolnir (5) | ||
!style="background:#FBFFE6;"| | !style="background:#FBFFE6;"| +2% | ||
|- | |- | ||
!style="background:#FFFBE6;"| | !style="background:#FFFBE6;"| | ||
| Linha 1 286: | Linha 1 329: | ||
!style="background:#FFEBCD;" | Bonus | !style="background:#FFEBCD;" | Bonus | ||
|- | |- | ||
!style="background:#EAFFE6;"| | !style="background:#EAFFE6;"| Calabouço de Magma (A1) | ||
!style="background:#EAFFE6;"| | !style="background:#EAFFE6;"| +3% | ||
|- | |- | ||
!style="background:#FBFFE6;"| | !style="background:#FBFFE6;"| Calabouço de Magma (A1) | ||
!style="background:#FBFFE6;"| | !style="background:#FBFFE6;"| +3% | ||
|- | |- | ||
|} | |} | ||
Edição das 01h13min de 25 de abril de 2023
Sistema de coleções
| A felicidade de obter itens em Arkaik:Tales of Sarina | Em Arkaik:Tales of Sarina até mesmo aqueles itens inúteis te fazem feliz ao serem obtidos! |
|---|---|
| Veja os itens necessários para ativar bônus permanente na tela de coleções (ALT + C) | Em qualquer momento, abra sua tela de coleções] (ALT + C) e veja quais são os itens que você precisa obter neste mapa para ativar um bônus especial que funciona para sempre em seus personagens. |
| Anúncio no chat do jogo ao obter um item | Sempre que você obter um dos itens, será anunciado no chat de seu jogo. |
| Varie os mapas e complete a coleção com seu próximo personagem | O progresso da coleção é compartilhada com todos os seus personagens, então que tal variar os mapas com seu próximo personagem e completar toda a coleção? |

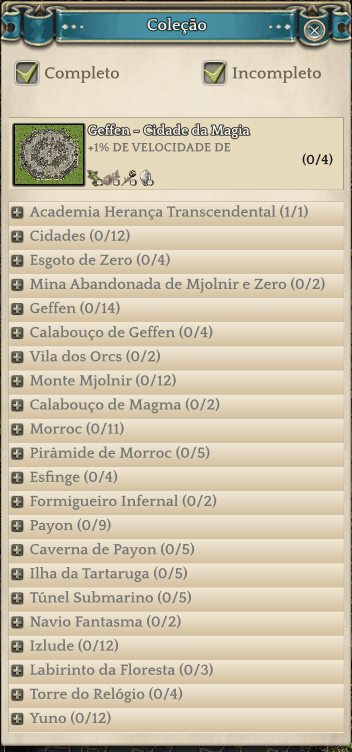
Tela de Coleção
Especificações do Sistema
| Especificação | Tipo |
|---|---|
| Vínculo | Conta |
| Restrições | Nenhuma |
BONUS EXTRAS = STATUS BASE
FORÇA
| Mapa | Bonus |
|---|---|
| Arredores de Geffen (2) | +1 |
| Arredores de Geffen (10) | +1 |
AGILIDADE
| Mapa | Bonus |
|---|---|
| Esgoto de Zero (A1) | +1 |
| Esgoto de Zero (A2) | +1 |
| Monte Mjolnir (10) | +1 |
VITALIDADE
| Mapa | Bonus |
|---|---|
| Vila dos Orcs do Oeste | +1 |
INTELIGENCIA
| Mapa | Bonus |
|---|---|
| Arredores de Geffen (0) | +1 |
| Arredores de Geffen (1) | +1 |
| Arredores de Geffen (3) | +1 |
| Arredores de Geffen (4) | +1 |
| Arredores de Geffen (7) | +1 |
| Arredores de Geffen (9) | +1 |
| Feudo Britoniah | +1 |
DEXTREZA
| Mapa | Bonus |
|---|---|
| Monte Mjolnir (9) | +1 |
SORTE
| Mapa | Bonus |
|---|---|
BONUS EXTRAS = EXTRA STATUS BASE
ATAQUE
| Mapa | Bonus |
|---|---|
ESQUIVA
| Mapa | Bonus |
|---|---|
| Monte Mjolnir (12) | +2 |
DEFESA
| Mapa | Bonus |
|---|---|
DEFESA FISICA E MAGICA
| Mapa | Bonus |
|---|---|
% DE CHANCE DE ACERTO CRITICO
| Mapa | Bonus |
|---|---|
BONUS EXTRAS = VELOCIDADE DE ATAQUE FIXO E %
VELOCIDADE DE ATAQUE
| Mapa | Bonus |
|---|---|
BONUS EXTRAS = CONJURAÇÂO E CAST
% TAXA DE CONJURAÇÂO
| Mapa | Bonus |
|---|---|
CONJURAÇÂO FIXA -MS
| Mapa | Bonus |
|---|---|
BONUS EXTRAS = TODOS ATRIBUTOS
+1 EM TODOS OS ATRIBUTOS
| Mapa | Bonus |
|---|---|
BONUS EXTRAS = VIDA E SP MAXIMO + (REGENERAÇÂO + MATAR)
VIDA MAXIMA
| Mapa | Bonus |
|---|---|
| Campo de treinamento da academia | +75 |
| Esgoto de Zero (A4) | +70 |
| Monte Mjolnir (11) | +100 |
SP MAXIMO
| Mapa | Bonus |
|---|---|
% RECUPERAÇÂO NATURAL DE MANA
| Mapa | Bonus |
|---|---|
% DE REGENERAÇÂO DE MANA A CADA 15s
| Mapa | Bonus |
|---|---|
% RECUPERAÇÂO DE VIDA AO MATAR
| Mapa | Bonus |
|---|---|
RECUPERA MANA A CADA ATAQUE FISICO
| Mapa | Bonus |
|---|---|
RECUPERA HP CADA ATAQUE FISICO
| Mapa | Bonus |
|---|---|
CURA AO MATAR COM MAGIAS
| Mapa | Bonus |
|---|---|
BONUS EXTRAS = EFETIVIDADE DE CURA
EFETIVIDADE DE TODAS AS CURAS
| Mapa | Bonus |
|---|---|
% DE AUMENTO DE CURA PROVIDA DA HABILIDADE [CURAR]
| Mapa | Bonus |
|---|---|
% DE EFICACIA DOS ITENS DE CURA
| Mapa | Bonus |
|---|---|
BONUS EXTRAS = PESO / CARGA
CAPACIDADE DE CARGA MÁXIMA
| Mapa | Bonus |
|---|---|
BONUS EXTRAS = MOVIMENTAÇÂO
% VELOCIDADE DE MOVIMENTO
| Mapa | Bonus |
|---|---|
| Zero | +1% |
| Morroc | +1% |
| Geffen | +1% |
| Payon | +1% |
| Alberta | 1% |
| Izlude | 1% |
| Aldebaran | 1% |
| Comodo | 1% |
| Jawaii | 1% |
| Nifheim | 1% |
| Umbala | 1% |
| Yuno | 1% |
BONUS EXTRAS = ZENYS
% CHANCE DE GANHAR 100z AO DERROTAR MONSTROS
| Mapa | Bonus |
|---|---|
| Esgoto de Zero (A3) | +1% |
BONUS EXTRAS = REDUÇÔES DE DANO (CRITICO/CURTA/MAGICO/LONGA DISTANCIA)
% REDUÇÂO DE DANO CRITICO
| Mapa | Bonus |
|---|---|
% REDUÇÂO DE CHANCE AO RECEBER ATAQUE CRITICO
| Mapa | Bonus |
|---|---|
| Mina abandonada de Mjolnir e Zero (A1) | -1% |
% REDUÇÂO DE DANO A CURTA DISTANCIA
| Mapa | Bonus |
|---|---|
| Mina abandonada de Mjolnir e Zero (A2) | -1% |
| Mina abandonada de Mjolnir e Zero (A3) | -2% |
% DE DANO COM ATAQUE FISICO
| Mapa | Bonus |
|---|---|
% DE DANO COM ATAQUE MAGICO
| Mapa | Bonus |
|---|---|
% DE DANO MAGICO RECEBIDO
| Mapa | Bonus |
|---|---|
BONUS EXTRAS = AUMENTO DE DANO (CRITICO/CURTA/LONGA DISTANCIA)
% DE DANO FISICO A CURTA DISTANCIA
| Mapa | Bonus |
|---|---|
| Arredores de Geffen (8) | +2% |
| Arredores de Geffen (11) | +5% |
| Floresta Kordt | +2% |
% DE DANO FISICO A DISTANCIA
| Mapa | Bonus |
|---|---|
CRITICO COM ATAQUES A DISTANCIA
| Mapa | Bonus |
|---|---|
BONUS EXTRAS = REDUÇÔES DE DANO DE PROPRIEDADE
% REDUÇÂO DE DANO PROPRIEDADE VENENO
| Mapa | Bonus |
|---|---|
| Monte Mjolnir (6) | -3% |
% DE DANO ELEMENTO FOGO
| Mapa | Bonus |
|---|---|
BONUS EXTRAS = AUMENTO DE DANO DE PROPRIEDADE
% DANO CONTRA ELEMENTO VENTO
| Mapa | Bonus |
|---|---|
| Calabouço de Geffen (A4) | +2% |
% DE DANO CONTRA ELEMENTO TERRA
| Mapa | Bonus |
|---|---|
| Monte Mjolnir (4) | +2% |
% DE DANO CONTRA ELEMENTO AGUA
| Mapa | Bonus |
|---|---|
% DE DANO CONTRA ELEMENTO NEUTRO
| Mapa | Bonus |
|---|---|
% DANO CONTRA ELEMENTO FANTASMA
| Mapa | Bonus |
|---|---|
BONUS EXTRAS = DANO MAGICO E MISTO
% DE DANO MAGICO
| Mapa | Bonus |
|---|---|
% DE DANO FISICO/MÁGICO
| Mapa | Bonus |
|---|---|
BONUS EXTRAS = DANO EXTRA CONTRA RAÇAS
% DE DANO CONTRA MORTOS VIVOS
| Mapa | Bonus |
|---|---|
| Calabouço de Geffen (A1) | +1% |
| Calabouço de Geffen (A1) | +2% |
| Calabouço de Geffen (A1) | +5% |
| Calabouço dos Orcs (A1) | +2% |
| Calabouço dos Orcs (A2) | +3% |
% DE DANO CONTRA RAÇA PLANTA
| Mapa | Bonus |
|---|---|
| Monte Mjolnir (7) | +3% |
% DE DANO CONTRA RAÇA MORTO VIVO
| Mapa | Bonus |
|---|---|
% DE DANO CONTRA RAÇA BRUTA
| Mapa | Bonus |
|---|---|
| Monte Mjolnir (1) | +1% |
| Monte Mjolnir (2) | +1% |
| Monte Mjolnir (8) | +1% |
% DE DANO CONTRA RAÇA INSETO
| Mapa | Bonus |
|---|---|
| Monte Mjolnir (3) | +2% |
| Monte Mjolnir (5) | +2% |
% DE DANO CONTRA RAÇA DRAGÂO
| Mapa | Bonus |
|---|---|
% DE DANO CONTRA RAÇA PEIXE
| Mapa | Bonus |
|---|---|
% DE DANO CONTRA RAÇA HUMANOIDE
| Mapa | Bonus |
|---|---|
BONUS EXTRAS = HABILIDADES
% DE DANO COM LANÇAS DE FOGO
| Mapa | Bonus |
|---|---|
| Calabouço de Magma (A1) | +3% |
| Calabouço de Magma (A1) | +3% |
% DE DANO RELAMPAGO
| Mapa | Bonus |
|---|---|
% DE DANO TEMPESTADE DE RAIOS
| Mapa | Bonus |
|---|---|
BONUS DE FORÇA E AUMENTO % DE DANO GOLPE FULMINANTE
| Mapa | Bonus |
|---|---|
BONUS EXTRAS = REDUÇÂO DE HABILIDADES
% DE DANO DO PUNHO SUPREMO DE AZURA
| Mapa | Bonus |
|---|---|
BONUS EXTRAS = ARMAS
% DE DANO DO ADAGAS
| Mapa | Bonus |
|---|---|
% DE DANO DE ARCOS E DEXTREZA
| Mapa | Bonus |
|---|---|
BONUS EXTRAS = EXPERIÊNCIA
% DE EXPERIÊNCIA RECEBIDA
| Mapa | Bonus |
|---|---|